


Rhapsody3
RISCWorld
Chapter 2
Introduction
This section details how to enter and edit all the musical objects available in Rhapsody. Since most entering and editing is done in the same way, the first section is general, showing how to enter and edit objects. The rest of the section goes through all the available objects and any extra features that apply to them.
2.1 Basic procedures
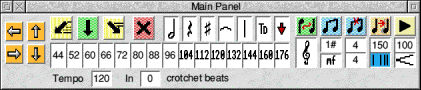
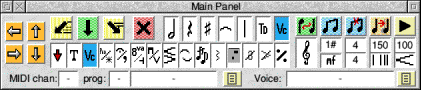
Here is the main panel with its icons grouped together.

Selecting a symbol
There are two sets of selection icons on the Panel: the main selection icons which consist of seven icons at top centre and also the icons to the bottom right, labelled more selection icons. Also there are fourteen subchoice icons which are shown at the bottom of the Panel. One icon out of each set is always highlighted (in blue by default), and the type of subchoice icons changes according to which group of musical symbols is selected. For example, when the Note group icon is selected the panel appears as above and you can select any of the notes to enter, but if you now select the Clef group icon the panel changes to this:

Note that if you click on a group icon when that group is already selected, the choice of object within that group is altered. Select moves the selection to the right; Adjust to the left. Alternatively, if you click on one of the subchoice icons the desired symbol is selected immediately.
Entering symbols
There are two ways of doing this, and you can choose whichever you find easier:
a) By clicking.
Select the symbol you wish to enter, position the cursor at the required place with, if it is relevant to do so, the small red arrows pointing at the exact position desired. Now click on one of the action icons in the top left of the Panel. The green Insert-at icon will place your object at the cursor position, if it makes sense. The yellow Insert-after icon will insert your object between the cursor and the next object, and the Insert-before icon, also yellow, will insert it between the cursor and the previous object. Clicking with Select puts the note stem up and Adjust puts it down. All this can be done with the keyboard as well: see Using the keyboard, chapter 12.
b) By dragging.
Select the symbol required, but hold down the mouse button when you click on it. (If it is one of the Selection icons the object may change, but Rhapsody will realise and return to the original one!) The pointer will change to a red image of the chosen symbol. Whilst still holding down the mouse button, move onto the Score window and release the button. Click as normal to insert the object using either the Select or Adjust button for note stems up or down. You will find that you can enter notes and rests between other notes or you can add to notes already there. You can do this until you move the mouse outside the Score window when the pointer will change back to its usual shape. Note that while in this mode, you can select new symbols using the keyboard. For example to select or change the length on a note, press one of the function keys F1 to F8.
2.2 Notes and Rests (Groups 1 & 2)
When notes or rests are selected, there are a number of extra symbols on the right which allow you to enter several symbols at once.
You can click on one or more than one of these. (The dot, the triplet and the tie are quite independent of one another and of the accidentals. In the case of notes, you could enter a tied crotchet F#, for example. In the case of rests, you could enter a dotted or triplet quaver.) Whenever you change the main selection in any way, these extra symbols are cleared. If you click repeatedly on one of the subchoice icons, you will cycle through these extra symbols. A quick double or triple click on one of the new notes will immediately set you up to enter a dotted or triplet note. You can't set up a dotted and triplet note in this way though!
When entering notes, using the Select button enters an up-stem note; using Adjust enters a down-stem note. When entering rests, these buttons have a different meaning. Using Select, the rest is inserted at its default position on the stave (which may mean putting it above or below the stave if there is a note already present in that slot). Using Adjust, the rest is placed at the position of the red cursor arrows. Like notes, rests can, of course, be dragged up and down the stave and positioned appropriately.
Rhapsody will choose an appropriate slot width for each note which takes into account any accidentals the notes in the slot may have and how long the notes are. It will also beam quavers and semi-quavers etc. automatically. Where notes lie on adjacent lines or where they actually overlap, Rhapsody will offset them correctly. There are, however, certain circumstances where you may want to over-ride Rhapsody's default settings or where you may want to do things differently.
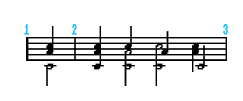
Firstly, you will often want to change the direction of a note's stem. This is achieved by positioning the cursor over the note and clicking on the swap-stems icon. If the slot contains a cluster (ie a chord), clicking with Select will swap the stem of the whole cluster. If the cursor is positioned over one of the notes in the cluster, clicking Adjust will swap the stem of that note only - in other words it will separate this note out.
If the slot already contains two clusters with opposite stems, then clicking Select will swap the stems of both clusters. If, on the other hand, the cursor is positioned over a particular note, clicking with Adjust will swap the stem if this note only. In this case, the note will be removed from one cluster and added to the other. Note that if the two clusters have different note values (as in the example below), when a note is removed from one cluster and added to the other, the note values do not change.
In this example, the first pair of clusters can be turned into any of the others by a suitable positioning of the cursor and choice of mouse button.
You can re-tail a whole stave or a marked block by using certain menu options. see page 64.
The two blue icons in the Main Panel are the force beam and break beam icons respectively and are used to override Rhapsody's automatic beaming. If you want to force a beam over a gap, (or even over a rest,) place the cursor on the note preceding the gap and click on the force beam icon using the Select button. You can undo this effect by using the Adjust button.
In a similar way, if you want to break a beam anywhere, click on the break beam icon. As before Select is used to insert the effect, Adjust to remove it.
The fourth icon in this group is used to adjust the slot width . You will have noticed faint guide lines around the notes in a score which indicate the limits of the slots. The width of this slot can be adjusted, as can the distance of the note from the front of the slot to make extra room for things like spread chord signs if necessary. Basically, if you click Select on this icon you increase the slot width while Adjust decreases it. If you hold down the <Ctrl> key at the same time, you can change the front space in the same way. (There is an undocumented feature of Rhapsody 3 which allows you to get the same effect by holding down the Menu button instead of the <Ctrl> key as you click Select or Adjust)
2.3 Accidentals ties and triplets etc. (Groups 3 & 4)
Seven types of accidental are available including double sharps and flats and naturalised accidentals. When accidentals occur close together in the same cluster Rhapsody will offset them to make them more readable.
Moving on to Group 4, we find the following subchoices:
The first is a tie. Rhapsody will try to tie a note to the next note with the same stem at the same pitch. If it cannot find such a note within the current bar or the first note of the next bar, it will tie it to the next note at the same pitch, regardless of stem.
tab}Note that it is not possible to tie one note only of a cluster. If you add a tie to a chord, Rhapsody will try to find a suitable partner for each separate note.
The next icon in the group is a slur. You can put a slur across several notes but Rhapsody will not print slurs across a bar line. (If you need to slur across a bar line, use a phrase mark instead - see page 36). This is what you can do with slurs:

Next come dots, double and triple dots. These lengthen a note by 1/2, 3/4 and 7/8 respectively. Insert and delete as usual.
Finally, triplets and other groupings. Six common values are provided: the standard triplet which plays 3 notes in the space of 2, next the duplet, playing 2 notes in the space of 3, then 4 in the space of 3, 5 in the space of 4, 6 in the space of 4 and 7 in the space of 8. If you want a different grouping then first click in the writable icon to the right which initially says 9:8. Delete these figures and type in the grouping that you want eg 5:6 would mean 5 notes played in the space of 6. Now select the last icon in the group - the one that says 'n' - and insert in the usual way, Most groupings up to 15 notes long can be catered for.
2.4 Bar lines and repeats (Group 5)
Group 5 contains a bewildering variety of bar lines. The first three are proper bar lines in that they provide the basic synchronisation for the whole score. The other bar lines are called supplementary bar lines and may be placed anywhere in the score without affecting the way the score plays. Supplementary bar lines often coincide with proper bar lines and are inserted on top of the proper line. You can tell whether a supplementary bar line has a proper bar line underneath it or not because all proper bar lines have a bar number written in blue over the top.
1st and 2nd time bars are taken into account when a score is being played but for this to work properly, the 1st time bar or bars should end with a repeat bar line.
This icon is not a bar line but is used to insert a rehearsal letter or number and must be added to a proper bar line. The actual letters or numbers printed are calculated automatically by Rhapsody and you do not have to alter figures further down the score if you decide to add a new one or delete one. To specify whether letters or numbers are used, see the Print options section on page 76.
This is a half bar line and it can be used anywhere in a score, for example, to divide a 7/4 bar into 4 and then 3. One of its most important uses, however, is to enable you to start a piece with what is called an anacrusis . The following score will not play correctly because the first bar is incomplete
On the other hand, this one will be played correctly because the very first bar line has been removed and replaced with a half bar line. (The half bar line is actually obscured by the solid line which occurs at the start of every stave. The only actual difference you can see lies in the bar numbering which is now correct.)
Next comes the double bar which is often used to separate one musical section from another eg a minuet from a trio. Note that it can be put on top of a proper bar line or it can be used in the middle of a bar. It has no effect on the way a score is played.
This bar line is always used to end a piece of music. Although Rhapsody often puts in a proper bar line at the end of a score because it assumes that you will want to add some more notes, a finished score should not have a proper bar line at the end . If it does, Rhapsody will always go on playing an extra bar which you will hear if you have got the 'Beat' option on. Simply delete the proper line and put this one in instead.
Next we come to a trio of repeat bars. Remember, you do not have to put these on a proper bar line (though they nearly always are). If you do not put them on a proper bar line, ensure that the start and end repeats are on the same beat of their corresponding bars otherwise strange things will happen when playing the score.
The next icon (which looks a little like a Zulu warrior's shield) is a strange one. It is a blank slot and is sometimes used to separate the Coda (ie an extra bit at the end) from the main piece of music. Here is an example which will also serve to illustrate the use of the coda wheel and the Coda sign described below.
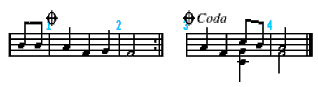
This icon, like the next three, contains two symbols. The upper one (the Segno sign) is inserted with the Select button (or <Space>bar), the lower one (the Coda wheel ) is inserted with the Adjust button (or <Shift><Space>). Both of these are simply signs but they mean very different things. The position of the Segno sign is remembered and when a D.S. or Dal Segno sign is encountered, the music goes back to the Segno sign. On the other hand, when the Coda wheel is encountered for the second time , the music skips forwards to the Coda itself - also marked with a Coda wheel and the word Coda (see below).
The D.C. sign (Da Capo ) means go back to the beginning . Using the Adjust button inserts a Da Capo al Fine sign which means go back to the beginning and play until you get to the Fine sign (see below).
The D.S. sign (Dal Segno ) means go back to the Segno sign . Using the Adjust button inserts a Dal Segno al Fine sign which means go back to the Segno sign and play until you get to the Fine sign (see below).
Finally we come to the Fine and Coda icon. As always, Select inserts the upper one, Adjust the lower. For further information see page 106.
2.5 Accents and trills (group 6)
The sixth group contains a number of symbols which determine how a note is to be played. The first four of these are accents - staccato : this is a short note, usually played about 50% of the notes actual length; spiccato : often very short (literally: spiky); marcato : usually slightly detached and a little louder (literally: marked) and sforzato : strongly accented. Rhapsody automatically plays marcato and sforzato notes louder. The lengths of the notes can be set within the score (see the section on trill definitions below).
Next comes the glissando icon. Rhapsody will draw a line from this note to the next note with the same stem. On playing through MIDI, Rhapsody uses the pitch bend codes to play the glissando. For this to work properly, your MIDI instrument must have pitch bend set to ON for the particular voice you are using and the pitch bend range set to 128 = 12 semi-tones. The computer's internal voices cannot be made to alter pitch while playing.
Then come three tremolo icons. When applied to a long note, the first will play repeated quavers, the second repeated semi-quavers and the third, demi-semi-quavers.
After this come a group of six trills all of which are user-definable. By default the first two are set to continuous trills, the first being a whole tone and the second a semi-tone. When printed, these trills are shown continuing for the whole length of the note (which may of course be tied across several notes).
The next two trills (technically known as inverted mordents ) are set to play a single, descending shake. As with the first two, the larger one is a tone wide, the smaller one a semi-tone.
This one is known as a turn ...
and this one is set to play a Romantic style trill - ie a long trill with a turn at the end.
If you want to change the definition of these trills (which you can do as many times as you like within a score) you must insert a trill definition command. As soon as you click on this icon, the trill definition window opens up.

Down the left hand side are the six available trill symbols. Each has a long box with 6 fields in it separated by dotted lines. Clicking in any of these areas cycles through the available options. The first two fields are best understood by imagining a trill on the note G. If the flat and the sharp are in grey, both the upper and the lower intervals will be tones - ie the trill will use an A natural and an F natural. When you click on either of these fields, the flat or sharp will be shown in black and the trill will use an Ab or a G# making the relevant interval a semi-tone.
The next field allows you to determine whether the trill begins on the upper, the lower or the middle note. The next allows you to put in an extra turn at the beginning. The long field specifies how many shakes the trill will have. It can be set to show zero, one, two or three shakes. In the latter case, this means a continuous trill. Finally, the last field allows you to put in a turn at the end. In brief, you ignore the greyed out notes - the trill sounds the black notes only.
The box at the right hand end with a number in it specifies the number of notes which must fit into a crotchet beat. For example, the number 8 represents 8 notes to the crotchet ie demi-semiquavers. In Baroque and early Classical music, trills invariably started on the upper note and therefore contained an even number of notes. It is best, therefore, to stick to powers of 2 in this case. Later Romantic music is characterised by trills which begin on the middle note and which have an odd number of notes in them. In these cases it is best to work out exactly how many notes you require and set the number accordingly. Use Select to increase the number and Adjust to decrease it.
At the bottom of the window are four icons which determine the length of the four types of accents. They can be set from 10% to 100% in the usual way.
When you have defined your trills, don't forget to insert the definition into your score at an appropriate point either by using the insert-at icon or by clicking on OK at the bottom of the window.
2.6 Clefs
Six clefs are available - treble, alto, vocal tenor, instrumental tenor (or baritone), bass and percussion. When you insert a new clef into a stave, the notes which follow it automatically shift their positions on the stave so as to maintain their pitch. Note that this will not always be satisfactory as the stems will probably have to be changed. Note also that this process can sometimes cause notes to go off the end of the stave (the limits are six leger lines below and five and a half above). When this happens, the notes are transposed by an octave to fit.
The percussion stave produces the same effect as a treble clef. (If your drum kit uses a lot of very low notes, use a suitable transpose interval for that particular stave (see page 49)).
2.7 Key signatures
The icons show major key signatures in black, and minor ones below in grey:
Key signatures range from 7 flats to 7 sharps and include automatic naturalised key signatures . For example, If you are writing in D major (3 sharps) and you put in a G major key signature (1 sharp), Rhapsody will print 1 sharp followed by 2 naturals as required by the rules. If, however, you insert an F major key signature (1 flat), the rules strictly require that you naturalise the sharp key first before going into the new key. Rhapsody does not do this for you automatically because it is regarded by some as being rather pedantic. You can easily accomplish this, however, by inserting a C major key signature before the F major one like this:
2.8 Dynamics
Although only 8 subchoices are shown, 15 dynamic levels are available corresponding to the 15 volume levels of the computer's internal voices. By default, ppp corresponds to volume level 1 and fff to level 15 with intermediate levels being indicated by a small + sign (eg mf+ ). Level zero is indicated by a dash and is silent.
If you are using a MIDI instrument, it is important to understand the difference between dynamic level (ie pp , ff etc.) and overall volume (which is dealt with later). The dynamic level is used to determine what is known as the key-on velocity . (ie how hard to strike the note). When performing piano music it is best to control the loudness using dynamics symbols rather than volume changes because a good MIDI instrument will change the quality of the sound as well as the loudness when the key-on velocity changes. If you are using the internal voices, however, and you like using dynamics, the softer levels can be almost inaudible. It is possible to set the levels actually used when the score is played using one of the options in the Preferences window (see page 91).
Whether using MIDI or internal voices, it is often necessary to put more dynamic markings in the score than you actually need printed - for example, if you want to put a forte (f ) marking in a piano part, you will need to insert a dynamic level into both staves. It is customary only to print one of them in the centre of the part. The other can be inserted as a non-printing dynamic by selecting the option Don't print beside the subchoice icons. In another example, the best way to achieve the effect of a crescendo in a piano part is to mark each note with a successively louder (non-printed) dynamic level.
2.9 Time signatures
Virtually any time signature is available of which 15 of the most common are displayed. If you want something like 11/8, simply click on the upper half of the time signature icon until is says 11, and on the lower half until it says 8.
It is not possible to put different time signatures on different staves. While there are a few cases which may require this it is not common and would usually be musical nonsense.
2.10 Tempo changes
All tempo markings are in crotchets per minute . This is so that in pieces of music with frequent time signature changes (eg between 3/4 and 6/8) the tempo indications can stay the same. It does, however, mean that if you are working in compound time (eg 6/8) the tempo mark which you must insert in the score may not be what you at first expected. For example, if the basic tempo is 60 dotted crotchets to the minute, the appropriate tempo marking would be 90 (ie 90 crotchets to the minute).
If you need a tempo indication which is not listed, click on the nearest one and the click repeatedly on the upper half of the tempo icon either with Select or Adjust until you reach the desired number.
If you click on the lower half, the panel opens out like this:
revealing two new boxes. These are used to insert a gradual accelerando (getting faster) or ritardando (getting slower). By clicking on one of the subchoice icons, or by clicking on the box itself in the usual way, you set the first box to the target tempo. The second box contains the number of crotchet beats over which the change is to take place.
A tempo change is indicated in the score as a green number over the top of the score but this is not shown on the printed page. Tempo indications such as accel. or rall. must be entered as text. (see below)
In reality, musical tempo changes are rarely uniform. In particular, a rallentando at the end of a piece may involve a slight slowing down in the penultimate bar with a much slower tempo for the last two notes. Pauses may be implemented by giving one note or rest a much slower tempo (but it is not possible to insert a silent pause where there is no rest in the music).
2.11 Volume changes
The scale used for volume changes goes from 0 (silent) to 127. (This is the range used by MIDI equipment.) As far as the internal voices are concerned, the volume setting is used as a scaling factor which multiplies the current dynamic setting for that particular voice at the current time. In practice, therefore, there are only 15 different levels which are effective, 120 being the maximum. With MIDI instruments, the control of volume is quite separate from the control of key-on velocity . (see the section on Dynamics above for further details).
To select a volume setting, either click on one of the subchoice icons or cycle through the available numbers by clicking on the upper half of the volume change icon.
If you click on the lower half, the panel opens to reveal two icons which can be used to determine a crescendo (getting louder) or decrescendo (getting softer). As with tempo changes, you can set the first box to the target volume either by clicking on one of the subchoice icons, or by clicking on the box itself in the usual way. The second box must be set to the number of crotchet beats over which the volume change is to take place again by clicking on it.
Unlike tempo changes which, of course, apply to the whole score, volume changes can be applied to individual staves as well as to the whole score. To insert a global change, use the Select button (or the <Space> bar). To insert a stave specific change, use the Adjust button (or <Shift><Space>).
Volume changes are shown in red, either at the top of the score or at the top of the stave to which they refer, but they are not shown on the printed page. To insert directions such as cresc. or dim . use the text option (see below). Alternatively, you can put in hairpins (see page 36), but these do not in themselves make any difference to the way the score is played.
2.12 Text and lyrics
The text entry icon will be found in group 8 ie the last of the main selection icons. When you select this icon, the panel opens as shown below:
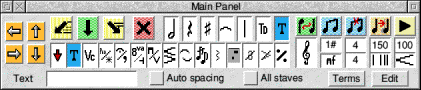
As always, the first thing to do is to position the cursor, and the red arrows, at the point at which you want to enter some text in your score. Next, make sure that the caret is visible in the text entry icon (The caret is the little red line that tells you where the text is going to appear on the screen). If it isn't visible, just click on the text entry icon to make it appear. Now type in up to 11 letters of text. (This will usually be sufficient for a single syllable or a short direction.) When you press <Return> the text will be entered and the cursor moved along one slot ready for the next syllable. It is therefore quite easy to enter a line of text, pressing <Return> after each word or syllable and skipping over the barlines or empty slots by pressing <Return> each time. <SHIFT-Return> has the effect of moving the cursor to the left and can be used as a DELETE key. For your convenience, a number of common musical terms are available from a menu which can be reached by pressing the Menu button over the main panel while this option is selected.
Unfortunately, there is no way of entering text more than 11 characters long. The only thing you can do is to split it up over several slots and adjust the slot widths so that the words run together. Alternatively you can purchase ScoreDraw3 which converts Rhapsody files into Draw files thus allowing you to enter text freely.
If you are entering the lyrics of a song, you will probably want to widen some of the slots to accommodate long words. This can be done automatically by selecting the Auto spacing option first. Alternatively, you can toggle this option on and off while typing text in using the <Escape> key. This has the advantage of not losing the caret.
For infornation on how to use different type styles or fonts, see page 79.
2.13 Voice changes
The Voice change icon allows you to do several things. Firstly, it allows you to change the internal voice allocated to a particular stave. Secondly, it allows you change the MIDI channel allocated to the stave and lastly to change the MIDI voice (the program change number ) on that channel.
When you click on the icon, the panel opens to reveal 3 icons:
Initially they all contain a dash which means 'no change'. Clicking on any of the icons with Select or Adjust will cycle up or down through the available values as usual and if you hold the button down, the values will cycle continuously.
The first icon sets the MIDI channel to a value between 1 and 16.
The second icon displays the program change number and also the name of the MIDI voice attached to that number. These voice names are kept in a text file in the !Rhapsody directory called Tones and you can edit this file so that it matches the names of the voices in your instrument. For further details on how to do this, see page 111.
The last icon cycles through the internal voice names which are currently loaded into the computer. If the voice you want is not listed, you must load the appropriate voice module (some examples are included on the accompanying discs) before selecting the Voice change icon.
2.14 Hairpins and Phrase marks
To enter a hairpin, click on the hairpin icon opposite, position the cursor with the red arrows at the place where you want the hairpin to start; then click on the insert-at icon using the Select button to insert a crescendo and the Adjust button to insert a diminuendo .
Almost certainly you will want to adjust the position of the end of the hairpin. This is marked with a blue spot. Simply drag the the spot where you want it by holding the Select button down over it.
You can drag the start of the hairpin in the same way but in this case, the whole hairpin is moved to a new position.
If you change the width of a slot which is covered by a hairpin, the hairpin will lengthen or shorten accordingly. If you insert or delete a slot, however, the hairpin does not alter in length. For this reason it is best to leave hairpins until all the notes are correct.
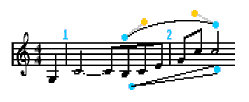
Phrase marks are entered in exactly the same way. This time the Select button inserts an upward bending bow while the Adjust button inserts a downward bending one.
As with hairpins, you can drag just the end point or the whole thing by dragging one of the blue end points. In addition, you can change the shape of the phrase mark by dragging the orange control points around. Like hairpins, phrase marks will lengthen and shorten if you change the width of the intervening slots but will not change when slots are inserted or deleted.
2.15 Grace notes
There are two kinds of grace note, acciaccaturas which are played very quickly in front of a note, and appoggiaturas which are much longer. The former is written as a small quaver with a line through it while the latter is written as a small note, half the length of the note to which it refers. Acciaccaturas are inserted with the Select button, appoggiaturas with the Adjust button.
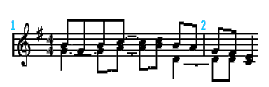
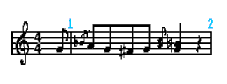
Grace notes may be placed on any stave, but you can only put one grace note on any one stave (though you can add notes to one already there - ie you can have 'grace chords'!). Grace notes may have accidentals added to them. Some adjustment of the slot widths (see page 24) was necessary to achieve the results in the following example.
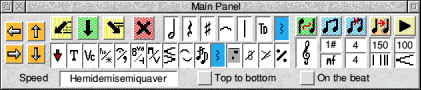
2.16 Spread chords
The icons which appear at the bottom of the panel when you select spread chords give you a number of options concerning the way the chord is played, including the speed, whether it is played from top to bottom or bottom to top and whether it is played on or before the beat. In romantic music such chords are usually played from bottom to top, before the beat so you can usually leave the two button items unselected.
2.17 Guitar chords
Selecting the Guitar chords icon opens up the Guitar chords window.
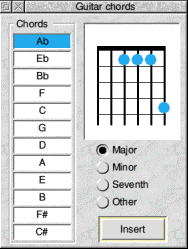
This allows to you edit or select any guitar chord you like. 36 default chords are supplied but you can edit these and save your preferred versions if you wish. (To save your guitar chords, see Saving your preferences on page 95.)
Four radio icons on the right swap between four 'pages' of chords. The default chords include all the major, minor and seventh chords. The fourth page is empty and is for your use as a temporary scratch pad or for your own preferences.
To select a chord, select the page you need and then click on the name of the chord in the list on the left. Use the insert-at icon to insert the chord at the cursor position. Alternatively, click on the Insert box at the bottom of the window. Note that guitar chords are always printed in the centre of the stave. Normally, guitar chords are printed on a blank stave (see page 49).
If you want to edit a chord or create a new one, Click with the Select button on or just above the chord grid to place the spots. The Adjust button removes the spot on that string. The icons on the left are writable so you can enter any name you wish (up to 8 characters).
When you insert a guitar chord in the score, the complete definition of the chord is inserted, together with its name. You are not restricted, therefore, to 48 pre- or user-defined chords. You can edit a chord for a unique place in a score and never use it again. It will still be there when you load the score again.
Guitar chords are played along with the score in the voice allocated to that stave. They are played for a minim and are slightly spread. Strings without spots are not played.
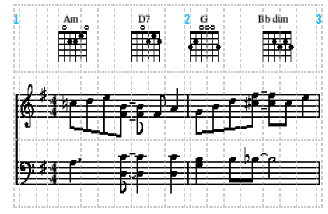
(In the above example, the guide lines have been included so you can see the presence of the blank stave above the piano part.)
2.18 Other symbols
This is the block marker . It is inserted in the usual way by positioning the cursor and clicking on the insert-at icon. It can be used to mark both the beginning and the end of a block which can then be copied, transposed etc. The marked block is shown shaded in the score. A block does not have to cover all the staves; it can be used to mark anything from a single slot to the whole score.
There is an easier way to insert a block. Double-click on the score with the Select button, holding the button down after the second click. In a short while, a box will appear which you can drag out to any extent over the whole score. When you have pulled it out the right amount, release the button. The block marker icon is still useful, however, if you want to extend or reduce the size of a large block.
This is the pedal icon. If you use the Select button you will insert a pedal on sign; the Adjust button inserts a pedal off . Pedal marks can be placed on any stave. In the case of the internal voices, the pedal will be active on that stave only. With MIDI voices, however, the pedal will be active on all the staves which share the same channel. This is better for piano music.
You can also insert a global pedal by holding the <Ctrl> key down while inserting the symbol. This is printed at the bottom of the system of staves and activates all the internal voices, but only MIDI channel 1. Rhapsody 2 scores will contain only global pedal marks. It is recommended that global pedals are placed on a blank stave of their own to differentiate between the two types.
Most MIDI instruments respond to pedal commands. As far as the internal voices are concerned, the pedal command will hold the voice on only until such time as that channel is needed again, and when the pedal is released, all the voices will terminate, even if some of the notes are longer than this.
There are two ways of printing pedal marks - you can set which one you want from the Print options window (see page 76).
The next item in group 7 contains a pause symbol and a breath mark. The former is inserted using the Select button, the latter with the Adjust button. Initially the symbols will be placed at the default position. If you need to change this, both symbols can be dragged up and down like any other symbol.
You can insert a general pause or a general breath mark by holding the <Ctrl> key down while pressing the mouse button. If you hold down the <Shift> key while inserting a pause (ie if you use Shift-<Select>), you can obtain an inverted pause .
None of these symbols has any effect on the way the score plays.
After this come the octavo signs - Select for on and Adjust for off . This will transpose a stave either up and octave or down an octave depending on whether the symbol is above or below the stave. As with other symbols, it can de dragged to any height. The octavo off symbol does not appear on the printed page as its position is shown by the end of the octavo line.
Next to the octavo sign are two bowing marks for down-bow and up-bow . Use Select and Adjust respectively. If the default positions clash with a note or stem, drag the symbol up or down, wherever you like.
At the very end of the group there are two icons whose meaning may not be at all clear. The first (which shows a 3 with a line through it) is the suppress triplet printing icon(!). It can be inserted anywhere in the score and its presence is marked by a similar orange symbol over the top of the score. What it does is to prevent printing of any triplet (or indeed any other grouping) from this point on in the score. Some pieces of music (for example Debbussy's first Arabesque on the examples disc) contain so many triplets that it is pointless printing them after the first bar. There will be occasions, however, when printing has to be reinstated in order to avoid confusion. This directive can be inserted using the Adjust button and is shown as an orange 3 (without the line).
This icon (the suppress accent printing icon) does for accents (that is staccato, spiccato, marcato and sforzato only) what the previous icon does for triplets. Like the other, printing can be reinstated at any point in the score by using the Adjust button when inserting the code.
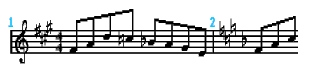
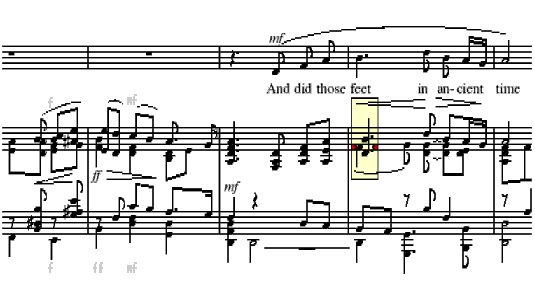
Here is a fragment of a score which contains many of the features discussed so far.
RISCWorld